کلینیک فوق تخصصی دانش آموخته لوله کشی صنعتی ۸۳-۸۴ ( نفت و گاز ) - مایترکاری
سایتی نو و نخست برای ارائه راهنمای ساخت انواع شابلون پایپینگ به Fabricator ها و بالا بردن دانش ریاضی ایشانکلینیک فوق تخصصی دانش آموخته لوله کشی صنعتی ۸۳-۸۴ ( نفت و گاز ) - مایترکاری
سایتی نو و نخست برای ارائه راهنمای ساخت انواع شابلون پایپینگ به Fabricator ها و بالا بردن دانش ریاضی ایشاندرباره من
 This topic is a little part of programming in access , We have reached to this goal just with efforts and more exercises also studying the Microsoft Office Documents and their various forums
ادامه...
This topic is a little part of programming in access , We have reached to this goal just with efforts and more exercises also studying the Microsoft Office Documents and their various forums
ادامه...
تست چسبندگی رنگ ASTM D3359-2017
Standard Test Methods for Rating Adhesion by Tape Test1
روش تست A در درجه اول برای استفاده در سایت ( Field ) در نظر گرفته شده است در حالی که روش تست B برای استفاده در محیط های آزمایشگاهی یا شاپ ( Shop ) مناسب تر است. همچنین، روش آزمایش B برای فیلمهای ضخیمتر از 125 میکرومتر (5 میلیمتر) مناسب در نظر گرفته نمیشود، مگر اینکه برشهای با فواصل وسیعتر استفاده شود و توافق صریح بین خریدار و فروشنده وجود داشته باشد.
TEST METHOD A—X-CUT TAPE TEST
TEST METHOD B—CROSS-CUT TAPE TEST
ابزار در روش A :
6.1 Cutting Tool—Sharp razor blade, scalpel, knife or other fine-edged cutting device. The cutting edges shall be in good condition, preferably new or newly sharpened.
خط کش فلزی برای اطمینان از برش های صاف ( خط برش )
6.2 Cutting Guide—Steel or other hard metal straight edge to ensure straight cuts.
نوارباپهنای ۲۵ میلیمترشفاف یا نیمه شفاف حساس به فشار با قدرت لایه برداری چسب بین 6.34 نیوتن بر سانتی متر و ۷ نیوتن بر سانتی متر
6.3 Tape—25-mm (1.0-in.) wide transparent or semitransparent pressure-sensitive tape with an adhesive peel strength between 6.34 N/cm (58 oz/in.) and 7.00 N/cm (64 oz/in.), as tested in accordance with Test Method D3330/D3330M, Test Method A, (equivalent to PSTC 101) and utilizing a 90 second dwell time on a standard steel panel.
استفاده از یک پاک کن لاستیکی ( پاک کن مداد ) یا غلتک لاستیکی برای اطمینان از خیس شدن خوب و یکنواخت پوشش با چسب نوار استفاده می شود.
6.4 Pressure Application Device—Although other devices may suffice, a rubber eraser or rubber roller is commonly used to ensure good and uniform wetting of the coating with the adhesive of the tape.
اطمینان از انجام برش تا فلز .
6.5 Illumination—A light source is helpful in determining whether the cuts have been made through the film to the substrate.
روش کار :
۱-محیط انتخابی باید تمیز و خشک باشد.
۲-ایجاد دو برش بطول ۴۰ میلیمتر در فیلم و با زاویه بین ۳۰ و ۴۵ درجه یکدیگر را در میانه قطع کنند.
۳- بررسی نفوذ لایه پوششی . درصورتیکه به بستر فلزی نرسیده باشید X دیگری در مکان دیگر فراهم کنید و سعی نکنید برش قبلی را عمیقتر کنید.
۴-در هر روز از آزمون ، قبل از شروع آزمایش ، دو دور کامل نوار از رول جدا و دور انداخته شود. یک طول اضافی بدون تکان بردارید و یک قطعه به طول حدود ۷۵ میلیمتر ببرید.
۵-قرار دادن مرکز نوار در محل تقاطع . نوار را با انگشت ها بکشید تا صاف شود تا هوا زیر نوار چسب گیر نکند. با دستگاه اعمال فشار روی سطح نوار محکم بمالید تا رنگ از نظر ظاهری uniform یا یکنواخت شود که این نشاندهنده تماس خوب و یکنواخت بین نوارچسب و سطح پوشش است.
۶-جدا کردن نوار از سمت آزاد آن و با سرعت ( بدون تکان دادن ) با حداکثر زاویه ۱۸۰ ، ظرف ۹۰ ( مثبت منفی ۳۰ )
۸- انجام دو آزمون دیگر روی سطح تست ، برای سازه های بزرگتر آزمون های کافی انجام دهید
8. Procedure
8.1 Select an area free of blemishes and minor surface imperfections. The area chosen for testing shall be clean and dry.
8.1.1 For specimens which have been immersed: After immersion, clean and wipe the surface with an appropriate solvent which will not harm the integrity of the coating. Then dry or prepare the surface, or both, as agreed upon between the purchaser and the seller.
8.2 Make two cuts in the film each about 40 mm (1.5 in.) long that intersect near their middle with a smaller angle of between 30 and 45°. When making the incisions, use the straightedge and cut through the coating to the substrate in one steady motion.
8.3 Inspect the incisions for reflection of light from the
metal substrate to establish that the coating film has been penetrated. If the substrate has not been reached make another X in a different location. Do not attempt to deepen a previous cut as this may affect adhesion along the incision.
8.4 At each day of testing, before initiation of testing,
remove two complete laps of tape from the roll and discard. Remove an additional length at a steady (that is, not jerked) rate and cut a piece about 75 mm (3 in.) long.
8.5 Place the center of the tape at the intersection of the cuts with the tape running in the same direction as the smaller angles. Smooth the tape into place by finger in the area of the incisions taking care not to entrap air under the tape. Rub firmly over the surface of the tape with the pressure application device until the color is uniform in appearance. This indicates good, uniform contact between the tape’s adhesive and the coating surface.
8.6 Within 90 (plus/minus 30) s of application, remove the tape by seizing the free end and pulling it off rapidly (not jerked) back upon itself at as close to an angle of 180° as possible.
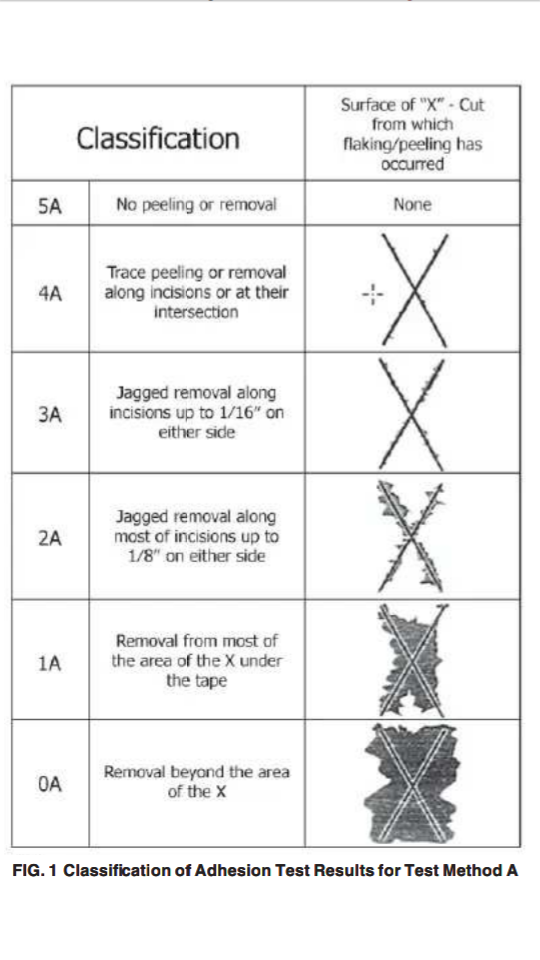
8.7 Inspect the X-cut area for removal of coating from thesubstrate or previous coating and rate the adhesion in accordance with the following scale:
5A No peeling or removal,
4A Trace peeling or removal along incisions or at their intersection,
3A Jagged removal along incisions up to 1.6 mm (1⁄16 in.) on either side,
2A Jagged removal along most of incisions up to 3.2 mm (1⁄8 in.) on either
side,
1A Removal from most of the area of the X under the tape, and
0A Removal beyond the area of the X.
8.8 Repeat the test in two other locations on the test surface. For large structures make sufficient tests to ensure that the adhesion evaluation is representative of the whole surface.
8.9 After making several cuts examine the cutting edge and, if necessary, remove any flat spots or wire-edge by abrading lightly on a fine oil stone before using again. Discard cutting tools that develop nicks or other defects that tear the film.
روش B : یا برش کِراس
۲-انتخاب ناحیه ای عاری از لکه ها و عیوب جزیی سطح ، انجام برش های موازی :
- برای پوشش های دارای ضخامت فیلم خشک تا خود ۵۰ میکرون فضای بین خطوط برشی یک میلیمتر و ۱۱ خط برش مگر اینکه چیز دیگری توافق شده باشد.
-پوشش بین ۵۰ تا ۱۲۵ میکرون فضای بین خطوط برشی ۲ میلیمتر و ۶ کات ... برای پوشش بالای ۱۲۵ میکرون توصیه می شود از روش A یا x-cut استفاده شود . با توجه به توافق خریدار و فروشنده، روش تست B را می توان برای فیلم هایی با ضخامت بیشتر از 125 میکرومتر (5 میل) در صورت استفاده از برش های با فاصله بیشتر استفاده کرد.
-انجام تمام برش با طول حدود ۲۰ میلیمتر ، حتما با فشار کافی به لایه زیرین برسید.
۳-کشیدن برس نرم ( به آرامی ) روی فیلم برای جدا شدن پوسته ها
۶-دور انداختن دو دور از نوار قبل از آزمایش در هر روز از آزمایش . طول اضافی را با سرعت ثابت ( بدون تکان ) بردارید و یک تکه حدود ۷۵ میلیمتری ببرید.
۷-قرار دادن مرکز نوار روی شبکه و کشیدن انگشت برای عدم حبس هوا در زیر نوارچسب .
۸-جدا کردن نوار از سمت آزاد آن و با سرعت ( بدون تکان دادن ) با حداکثر زاویه ۱۸۰ ، ظرف ۹۰ ( مثبت منفی ۳۰ )
۹-با استفاده از ذره بین روشن، ناحیه شبکه را برای برداشتن پوشش از زیرلایه یا از پوشش قبلی بررسی کنید. میزان چسبندگی را مطابق با مقیاس زیر که در شکل 1 نشان داده شده است، ارزیابی کنید
۱۰-انجام تست در دو محل دیگر

13.2 Select an area free of blemishes and minor surface imperfections, place on a firm base, and under the illuminated magnifier, make parallel cuts as follows:
13.2.1 For coatings having a dry film thickness up to and including 50 µm (2 mils) space the cuts 1 mm apart and make eleven cuts unless otherwise agreed upon.
13.2.2 For coatings having a dry film thickness between 50µm (2 mils) and 125 µm (5 mils), space the cuts 2 mm apart and make six cuts. For films thicker than 125 µm (5 mils), it is generally recommended to use Test Method A. Subject to agreement between the purchaser and the seller, Test Method B can be used for films thicker than 125 µm (5 mils) if wider spaced cuts are employed
13.2.3 Make all cuts about 20 mm (3⁄4 in.) long. Cut through the film to the substrate in one steady motion using just sufficient pressure on the cutting tool to have the cutting edge reach the substrate. When making successive single cuts with the aid of a guide, place the guide on the uncut area.
13.3 After making the required cuts brush the film lightly with a soft brush or tissue to remove any detached flakes or ribbons of coatings.
13.4 Examine the cutting edge and, if necessary, remove any flat spots or wire-edge by abrading lightly on a fine oil stone. Make the additional number of cuts at 90° to and centered on the original cuts.
13.5 Brush the area as before and inspect the incisions for reflection of light from the substrate. If the metal has not been reached make another grid in a different location.
13.6 At each day of testing, before initiation of testing, remove two complete laps of tape from the roll and discard.Remove an additional length at a steady (that is, not jerked) rate and cut a piece about 75 mm (3 in.) long.
13.7 Place the center of the tape over the grid and in the area of the grid. Smooth the tape into place by finger in the area of the incisions taking care not to entrap air under the tape. Rub firmly over the surface of the tape with the pressure application device until the color is uniform in appearance. This indicates good, uniform contact between the tape’s adhesive and the coating surface.
13.8 Within 90 ( Plus/Minus ) 30 s of application, remove the tape by seizing the free end and rapidly (not jerked) back upon itself at as close to an angle of 180° as possible.
13.9 Inspect the grid area for removal of coating from the substrate or from a previous coating using the illuminated magnifier. Rate the adhesion in accordance with the following scale illustrated in Fig. 1
13.10 Repeat the test in two other locations on each test panel.


